Why?
- RPI 3: Sitting around collecting dust.
- Pi-hole: I hate ads, this is an amazing tool that blocks ads for all devices connected to a network.
- DNS-Over-HTTPS: Fewer people having access to my internet usage information.
- WireGuard: Secure remote access to my homelab, and with Pi-hole ad-blocking from my mobile phone.
- Learning!
I am doing all of this to learn networking and linux administration. So, when I can choose the easy way or the hard way, I take the hard way. If you’re looking for the fastest way to setup a VPN and Pi-hole, you may want to consult another guide. This article is mostly for myself to have documentation of all the decisions I’m making at home. I will present the resources I consult alongside key artifacts and descriptions of where I varied my setup from the references.
Router specifics
A lot of what I did was enabled by my router, a capable tool called the EdgeRouterX. When relevant I’ll show the Firewall, NAT and DNS settings I used. You’re probably running something else, you may be able to do what I did with your router, or maybe not. I’ll leave it to you research how to make similar changes on your router or firewall.
Conceptual Diagram
Accessing my home network when I’m away, and getting the benefit of ad-blocking while I’m connected over the VPN.

SSH Access for the RPI 3
This is an optional step, you can plug a monitor into your RPI 3 if you want. I prefer to use my normal workstation and ssh into the RPI 3 to work on it.
When complete you should be able to SSH into the pi.
ssh pi@<your-pi-IP>
Running Pi-hole
The Pi-hole is a DNS server that you can use on your network to filter out ads before they every get to your browser page. This section details getting a Pi-hole up and running.
Prerequisites
For firewall settings I blindly ran these commands after reading a little bit in the docs about what they do.
iptables -I INPUT 1 -s 192.168.0.0/16 -p tcp -m tcp --dport 80 -j ACCEPT
iptables -I INPUT 1 -s 127.0.0.0/8 -p tcp -m tcp --dport 53 -j ACCEPT
iptables -I INPUT 1 -s 127.0.0.0/8 -p udp -m udp --dport 53 -j ACCEPT
iptables -I INPUT 1 -s 192.168.0.0/16 -p tcp -m tcp --dport 53 -j ACCEPT
iptables -I INPUT 1 -s 192.168.0.0/16 -p udp -m udp --dport 53 -j ACCEPT
iptables -I INPUT 1 -p udp --dport 67:68 --sport 67:68 -j ACCEPT
iptables -I INPUT 1 -p tcp -m tcp --dport 4711:4720 -i lo -j ACCEPT
iptables -I INPUT -m conntrack --ctstate RELATED,ESTABLISHED -j ACCEPT

ip6tables -I INPUT -p udp -m udp --sport 546:547 --dport 546:547 -j ACCEPT
ip6tables -I INPUT -m conntrack --ctstate RELATED,ESTABLISHED -j ACCEPT
Installing
Pi-hole has TUI application to aid installation.
curl -sSL https://install.pi-hole.net | bash
My answers to the questions the TUI asks:
Note that throughout this article 192.168.1.1 is my router gateway, and 192.168.1.63 is the IP of my RPI 3.
- Select Upstream DNS Provider. To use your own, select Custom.
- Cloudflare
- Pi-hole relies on third party lists in order to block ads.
- StevenBlack
- MalwareDom
- Select Protocols (press space to toggle selection)
- IPv4
- IPv6
- Do you want to use your current network settings as a static address?
- IP address: 192.168.1.63/24
- Gateway: 192.168.1.1
- Yes
- Do you wish to install the web admin interface?
- On
- Do you wish to install the web server (lighttpd)?
- On
- Do you want to log queries?
- On
- Select a privacy mode for FTL.
- 0 Show Everything
After install be sure to copy your admin webpage login. I also checked the lines added to /etc/dhcpcd.conf (as referenced in the prerequisites). I didn’t actually find that Pi-hole had added any lines, so I configured dhcpcd.conf myself to statically set an IP for the RPI 3 on my network.
# Static IP configuration:
# Using my EdgeRouterX 192.168.1.1
# Pointing the nameserver locally and backed up with Cloudflare
interface eth0
static ip_address=192.168.1.63/24
static routers=192.168.1.1
static domain_name_servers=127.0.0.1
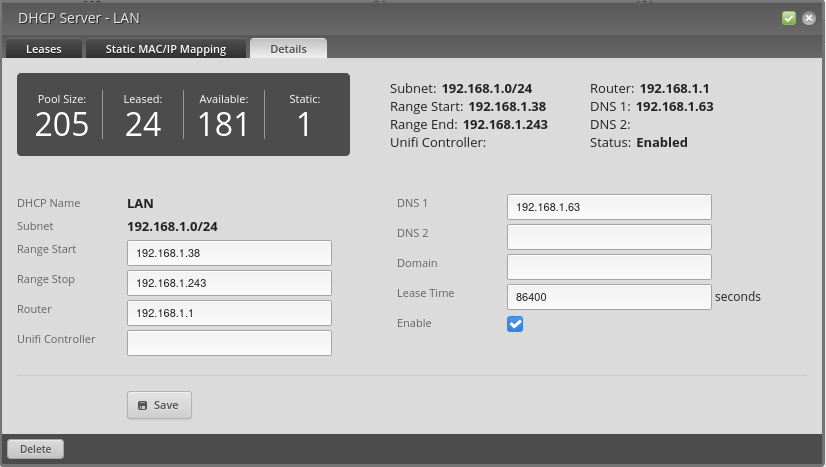
In EdgeRouterX I configured the LAN settings to have a reserved IP (Static MAC/IP Mapping) for the RPI 3.
| Name | MAC Address | IP Address |
|---|---|---|
| rpi3 | xx:xx:xx:xx | 192.168.1.63 |
Use Pi-hole for DNS with EdgeRouterX
With this configuration every device in the network uses the Pi-hole server to resolve DNS names.
Whitelist management script
This section details setting up a script to update the Pi-hole with commonly whitelisted domains. With this setup I rarely find that I need to whitelist random things that shouldn’t be blocked by the Pi-hole.
git clone https://github.com/anudeepND/whitelist.git
I setup a cron job with crontab -e
@weekly sudo /home/pi/whitelist/scripts/whitelist.sh
DNS Over HTTPS
Doing DNS over HTTPS adds another level of privacy, but it’s definitely optional. I chose to do this for my own learning.
Most, if not all, of this is in those docs. I’m just putting it here for documenting files I made on the RPI 3.
wget https://bin.equinox.io/c/VdrWdbjqyF/cloudflared-stable-linux-arm.tgz
tar -xvzf cloudflared-stable-linux-arm.tgz
sudo cp ./cloudflared /usr/local/bin
sudo chmod +x /usr/local/bin/cloudflared
cloudflared -v
rm ./cloudflared
rm ./cloudflared-stable-linux-arm.tgz
Configuring cloudflared to run on startup
sudo useradd -s /usr/sbin/nologin -r -M cloudflared
sudo vim /etc/default/cloudflared
# Commandline args for cloudflared
CLOUDFLARED_OPTS=--port 5053 --upstream https://1.1.1.1/dns-query --upstream https://1.0.0.1/dns-query
sudo chown cloudflared:cloudflared /etc/default/cloudflared
sudo chown cloudflared:cloudflared /usr/local/bin/cloudflared
sudo vim /etc/systemd/system/cloudflared.service
[Unit]
Description=cloudflared DNS over HTTPS proxy
After=syslog.target network-online.target

[Service]
Type=simple
User=cloudflared
EnvironmentFile=/etc/default/cloudflared
ExecStart=/usr/local/bin/cloudflared proxy-dns $CLOUDFLARED_OPTS
Restart=on-failure
RestartSec=10
KillMode=process

[Install]
WantedBy=multi-user.target
sudo systemctl enable cloudflared
sudo systemctl start cloudflared
sudo systemctl status cloudflared
Test it:
dig @127.0.0.1 -p 5053 google.com
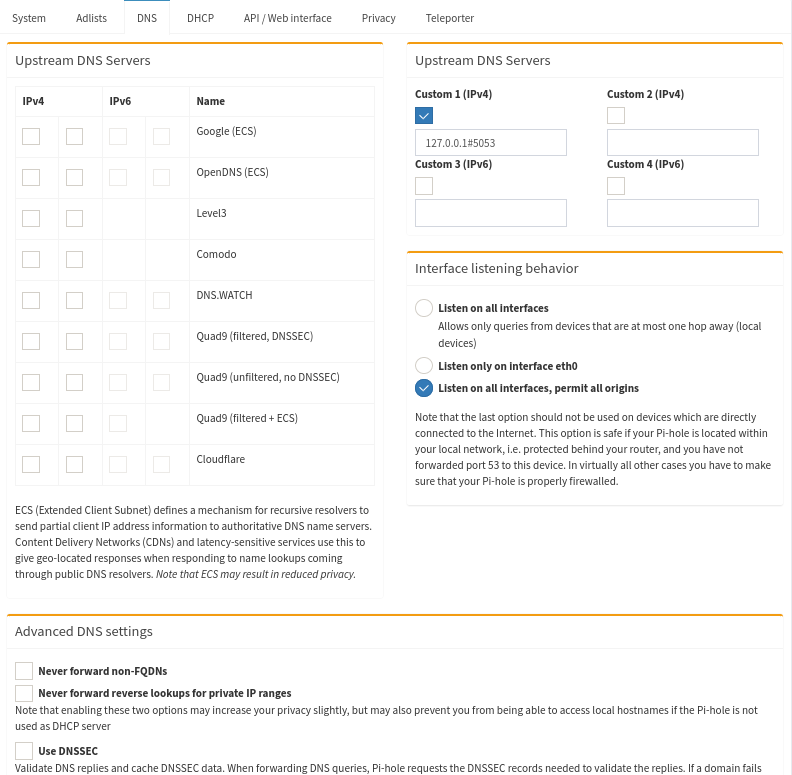
And configure the Pi-hole to use it as its Custom IPv4 Upstream DNS 127.0.0.1#5053. Below are my complete Pi-hole DNS settings.
Exposing our RPI 3 to the internet with DDNS.
- EngineerWorkshop - Connection your Raspberry Pi Webserver to the Internet
- Namecheap DDNS with EdgeRouterX
The Engineer Workshop blog describes using ddclient to set up a dynamic DNS client to inform the DNS nameservers of the world automatically whenever our dynamic IP is changed by the ISP. My EdgeRouterX can do this instead, so I opted to go that route. I use Namecheap as my registrar so there are some screens here of it’s administration UI.
Namecheap and EdgeRouterX DDNS setup
All of the Namecheap settings you need to change will be under the Advanced DNS on the management page for your domain. I setup DynamicDNS in my Namecheap domain management interface. There is a simple toggle to enable it and you get back a password. What DynamicDNS does is allow a DNS client to update the IP where the domain name mydomain.com resolves to. My EdgeRouterX has ddclient installed on it and has a configuration screen for it. The router can detect when my ISP has changed my Public IP and it will automatically update my domain name with the new IP.
To this end I setup an A+ Dynamic DNS Record for my top level domain, using 127.0.0.1 as a default value to begin with. If we setup our EdgeRouterX/ddclient correctly we should see this get updated with the real PublicIP of our home network.
| Type | Host | Value | TTL |
|---|---|---|---|
| A+ | @ | 127.0.0.1 | Automatic |
Here is the EdgeRouterX configuration:
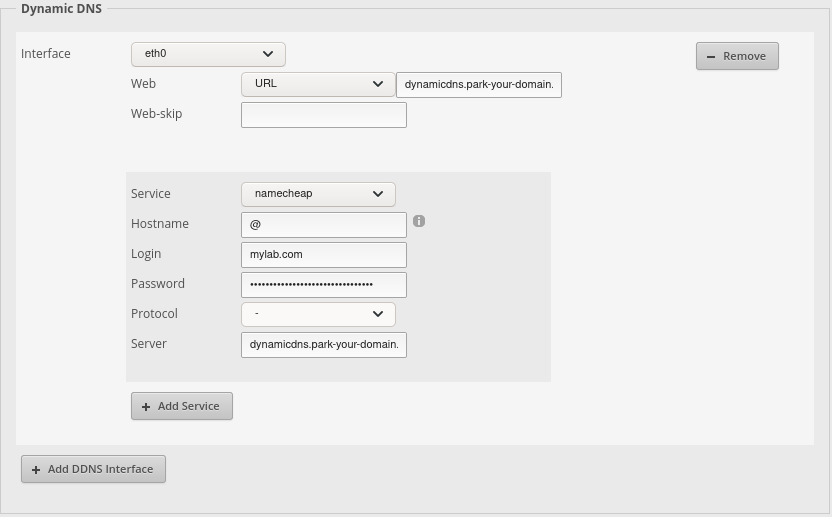
The URL field there is dynamicdns.park-your-domain.com/getip. And the Server is dynamicdns.park-your-domain.com
EdgeRouterX Port Forwarding
The last step in exposing our server to the internet is to punch a hole in our firewall that allows traffic to our domain name to be forwarded to port 51820 on our RPI 3 where the WireGuard VPN will be running.
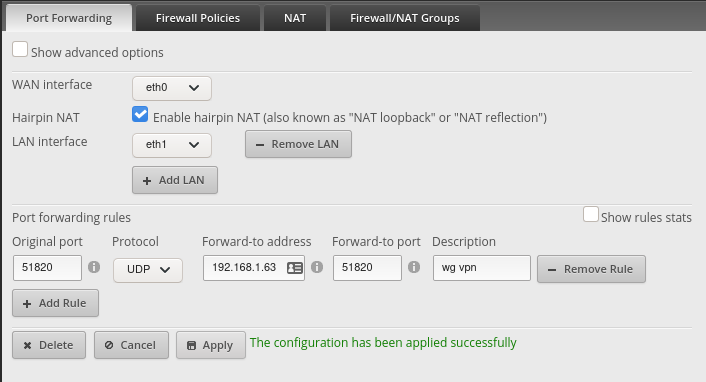
You won’t know if this is fully working until after you get through setting up WireGuard. You can verify what you have by instead opening up port 80 breifly and seeing that you can reach the Pi-hole webapp. BE SURE TO CHANGE IT BACK
Running WireGuard
WireGuard is a new-ish VPN technology that attempts to be simple and secure.
Installing
I followed the instructions on this github page . They were also referenced in this ]] which I also followed. It is fairly involved because wireguard isn’t in the main raspian distro. I chose to follow a mix of these instructions, but ended up writing my keys to a restricted location using umask 077 for a little extra security. I also chose to make my wg0 interface IPs be in the range 192.168.2.0/24. My RPI 3 WireGuard Server is 192.168.2.1 and it’s peer (the client) is 192.168.2.2. I also used the wg-quick@wg0.service systemd unit to run the server.
Here is my server config /etc/wireguard/wg0.conf.
[Interface]
Address = 192.168.2.1/24
SaveConfig = true
PostUp = iptables -A FORWARD -i %i -j ACCEPT; iptables -A FORWARD -o %i -j ACCEPT; iptables -t nat -A POSTROUTING -o eth0 -j MASQUERADE
PostDown = iptables -D FORWARD -i %i -j ACCEPT; iptables -D FORWARD -o %i -j ACCEPT; iptables -t nat -D POSTROUTING -o eth0 -j MASQUERADE
ListenPort = 51820
PrivateKey = <server_private_key>

[Peer]
PublicKey = <client_publick_key>
AllowedIPs = 192.168.2.2/32
Setting up my Arch Linux client
- WireGuard ArchWiki
- Set up cloudflared with WireGuard
- Pi-hole/WireGuard Reddit Post
- notasausage/pi-hole-unbound-wireguard
I’m using the linux-lts kernel so I ran the following.
# pacman -S wireguard-tools wireguard-lts systemd-resolvconf
And:
# systemctl enable systemd-resolved.service
# systemctl start systemd-resolved.service
My /etc/wireguard/wg0.conf
[Interface]
Address = 192.168.2.2/24
PrivateKey = <client_private_key>
DNS = 192.168.2.1

[Peer]
Endpoint = mydomain.com:51820
PublicKey = <server_public_key>
AllowedIPs = 0.0.0.0/0, ::/0
PersistentKeepalive = 21
To use the connection:
# wg-quick up wg0
# ... do things ...
# wg-quick down wg0
You can also download the app for WireGuard on your phone and connect with it. You can generate a QR code to scan on your phone here.
Conclusion
I hope you got through it too! My ads don’t always block when I’m on my Arch Linux laptop unfortunately. Be sure to email me if you find the solution to that. Thanks for reading!